Sunday 30 September 2012

Skinny Fudgy Banana and Peanut Butter Brownies


These brownies are like the best answer ever to a bad day.

Immediately after my family left last Friday I got to baking. I always feel sad when they leave, so this time I decided to channel that sadness into something creative. These brownies were the result.


I had a great week with my family - my Mum and I did a lot of shopping, got our nails done, spent the day in the city with my Dad's Mum, ate lots of good homecooked meals, saw the fantastic Spanish portraits at the art gallery, saw my brother win an award for one of his artworks and I even got to spend half a day with both my brother and Mum.

Sidebar: My brother drew a digital painting which will be displayed in the GOMA (in Brisbane) next year! We're all pretty proud of him for that.

So after a great few days and a harrowing weekend of uni work ahead, I knew I needed some chocolate. I had browning bananas calling my name as well, and I was desperately craving some peanut butter. After looking for recipes online I fell in love with two from Sally's Baking Addiction and A Full Measure of Happinness.


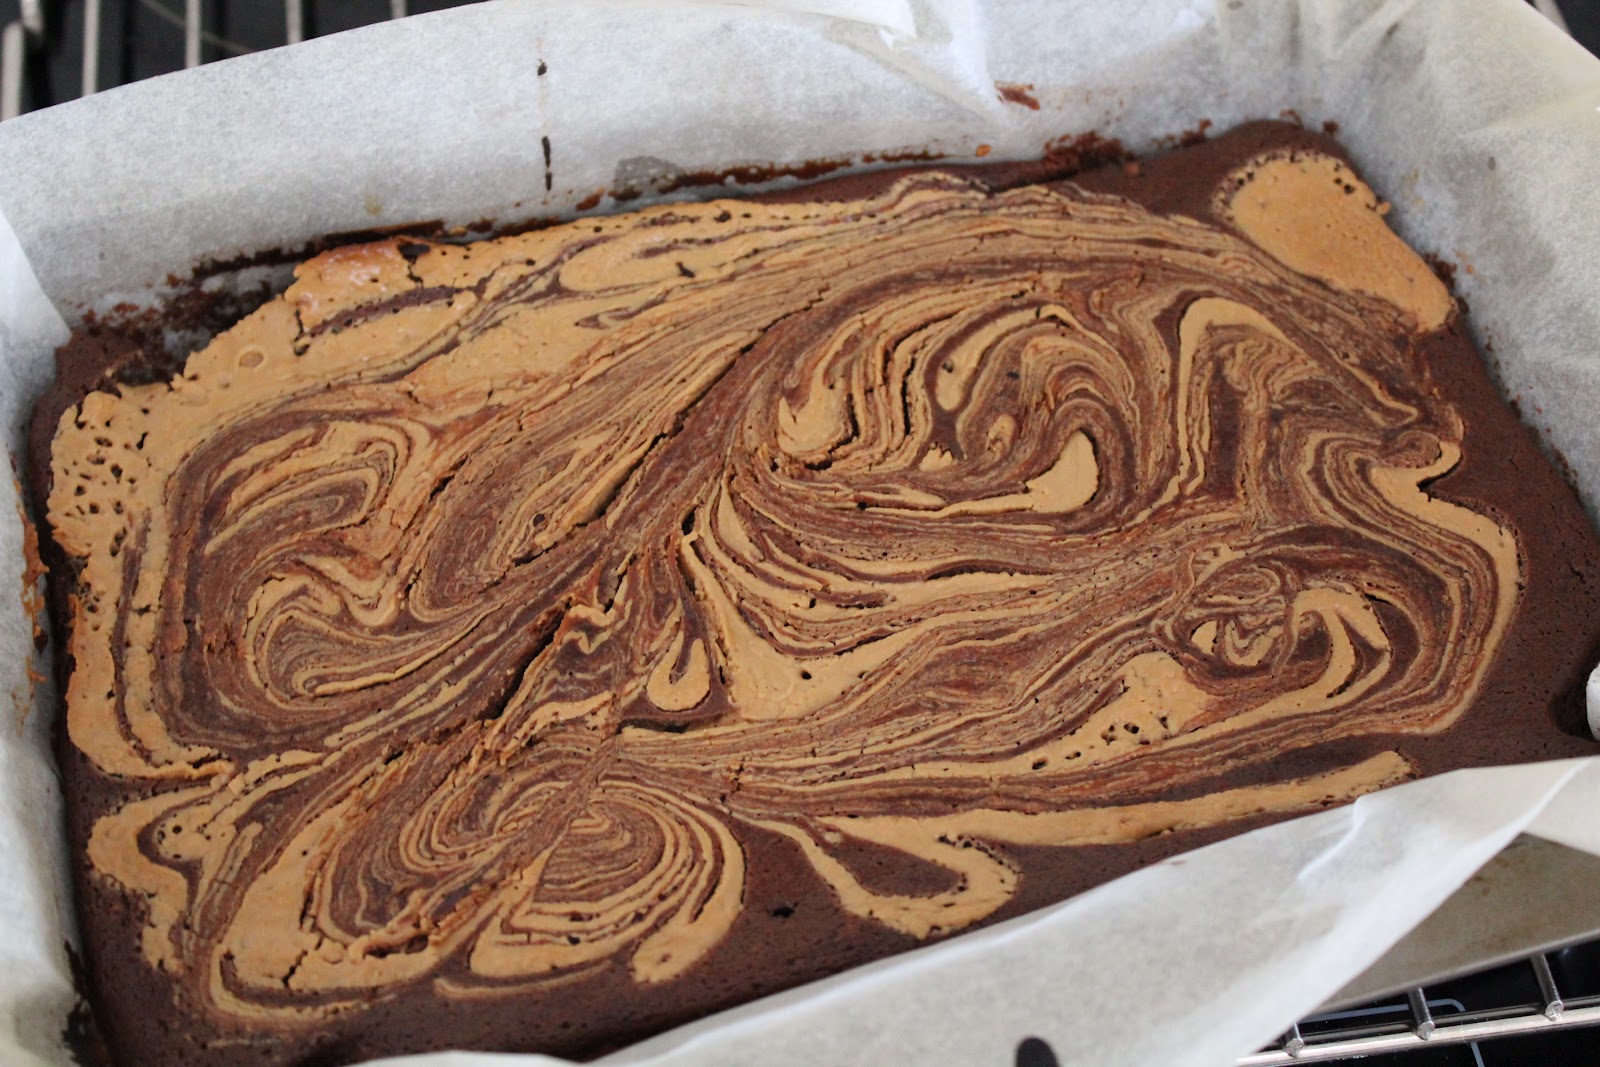
Neither recipe were really what I wanted. I also wanted to healthify the recipe a bit, because I knew I would be eating a few of these and I wanted a relatively healthy treat to post here. So here you have it: skinny fudgy banana and peanut butter brownies. The title says it all. They are relatively healthy without using crazy ingredients and they are fudgy, contain banana and have a cute PB swirl. These babies are moist, chewy and lip-smackingly good.

If you're having a bad day, a bad week or even a bad hour, make them. Hell, even if you're not, make them. There is enough chocolate to keep a chocoholic satisfied, there is a sweet, faint taste of banana and there is the ever present taste of peanut butter.

Please read the recipe substitutions below, if you don't have some of the ingredients I used.


Level of Difficulty: It’s almost a one-bowl recipe. Nothing too fancy here.  
Average Cost: $
Main Ingredients: Cacao powder, raw honey, banana and peanut butter
Occasion: I swear I will not say anything if you eat them for breakfast. Or for dinner. I did both of them.
Recipe Substitutions: When I say cacao powder, I mean it. I do not mean cocoa powder. If you are using cocoa powder that is completely fine, the recipe will still work, but cacao powder is a lot stronger and you may need more cocoa for a stronger, chocolate taste. Please make sure your bananas are very ripe (very brown) as this means a stronger banana taste will shine through the brownies. Use any yoghurt you please – Greek or full-fat yoghurt is usually nice and thick. Make sure it’s plain or vanilla flavoured though. I used a Greek-style yoghurt. Raw honey can be substituted for regular honey, but remember that raw honey is much sweeter and stronger. If you are using regular honey, which is fine, maybe add a little more. I would use my measurements first, and add more honey and not more sugar if it is not sweet enough. For those in Australasia, I used raw Manuka honey – brilliant flavour, very sweet and very strong.

Caloric wise, these brownies without the peanut butter are 97 calories. If you just want a regular banana brownie, then leave out the PB swirl at the end of the recipe and you have a fantastic snack for under 100 calories! Of course this count is merely an estimate as I do not have the skills to determine the proper count.

Makes 18 small brownies


What you will need:
-          1 egg
-          2 large, very ripe bananas, mashed
-          1/2 cup yoghurt
-          1/4 cup raw honey
-          1/2 cup oats
-          1/2 cup whole wheat flour
-          1/2 cup cacao powder
-          1 tsp baking soda
-          1/2 tsp salt
-          1/4 cup sugar
-          1/2 cup dark chocolate chips
-          1/2 cup peanut butter

What to do:

Preheat the oven to 180 degrees Celsius.

In a large bowl, combine the liquid ingredients (first four ingredients) including the mashed banana. Mix well together with a handheld or stand mixer.

Add in the remaining dry ingredients, with the exception of the chocolate chips and peanut butter. Mix well with the mixer until a relatively thick batter remains. Be careful not to overmix – mix until the last flour strands have disappeared,

Stir the chocolate chips in by hand, with a wooden spoon.

Pour the batter into a brownie pan.

Melt the peanut butter in a heatproof bowl (or in the measuring cup) in the microwave in 10 second increments until completely melted.

Dollop the peanut butter onto the top of the brownie mixture. I put five dollops on – one in each corner and one in the centre. Using a knife, swirl the peanut butter around so it makes a swirled pattern over the top of the brownie mixture. Again, be careful not to overmix.

Bake the brownies for 25 – 35 minutes. Allow to cool in pan for about 20 minutes once baked, before transferring to a rack to cool completely. Or cut open and eat immediately. But be careful – if you cut the brownies while hot, the peanut butter swirl may break away from the brownie mix. 


Friday 28 September 2012

Detox Salad


This is one of the quickest posts I will ever write. My Mum and brother have just left and it's pretty lonely around here as my roommates are not home. I'll recap the events of this week another time, as I just wanted to pop in and share this salad with you. Then I'm off to have an early night, catch up on some tv and get some much needed rest before I tackle my last load of assignments for the school year. I've got a hectic few weeks before I finish (4 weeks left of this year).

It's very simple and probably a combination you have seen of or heard before. My salad was definitely inspired by Iowa Girl Eat's Inner Goddess Detox Salad. I absolutely love her. She has fantastic and relatively easy recipes.


The reason why this salad is so great is because it is so simple - you literally toss the ingredients together, throw together a quick, sweet dressing and you are good to go. The ingredients are simple - you probably already have them all. There is nothing more like summer than the combination of sweet strawberries, tart blueberries, and tender chicken, drizzled in honey-esque sauce.

So get your ingredients ready and make yourself this nutritious, healthy and delicious salad. Right now. C'mon, you know you want to.


Level of Difficulty: So simple it’s ridiculous
Average Cost: $
Main Ingredients: Chicken, berries and honey
Occasion: Lunch – definitely a picnic-style meal. This would also make a simple and light dinner.
Menu Options: You could add other summer fruits if you like – apple and pear would make a lovely addition to this meal. You could use other greens – rocket, kale, iceburg or a mix of lettuces would suffice. You could add any other fruits and veggies you like, but remember the dressing has a honey base, so sweeter foods work with this dish.

Serves one.


What you need:
For the salad:
-          1 chicken breast, cooked and shredded into thin strips
-          1 cup mixed berries – I used strawberries and blueberries
-          1 cup spinach, torn into smaller bits
-          ½ tomato, diced
-          ¼ carrot, grated
For the dressing:
-          1 tsp honey
-          2 tsp oil
-          ½ tsp balsamic vinegar
-          2 tsp water
To serve:
-          ¼ cup flaked almonds

What to do:

In a bowl, combine chicken, berries, spinach, tomato and carrot.

Make the dressing. In a smaller bowl, combine honey, oil, balsamic vinegar and water until they make a thin dressing. If you want, add more honey for a stronger taste.

Toss the salad in the dressing and top with flaked almonds. Serve cold. 


Tuesday 25 September 2012

WIAW - After a cold

Happy Wednesday everyone. This post was done incredibly early this week as my Mum is visiting me again, this time for five days, so I'm off somewhere with her right about now.

On an unrelated note - is anyone else psyched that good tv returns this week? So many cliffhangers from last season! So much to catch up on. There goes uni work for the rest of the semester.

As it's Wednesday, it's time for WIAW. No preamble - straight into it this week. A huge thanks to Jenn at Peas and Crayons as per usual for hosting it.


Here is what I ate Saturday, which was my third day of no exercise for the week and the day I was supposed to do absolutely nothing in order to get over a horrid cold I had had all week which had ruined most of my plans. I didn't do nothing - I cleaned the apartment, went food shopping and discovered the fantastic tv show Awkward. I went back to the gym finally on Sunday, I was in desperate need by then, and it hurt. But it felt great.

Breakfast - The usual. Oats, banana, cinnamon, honey. Recycled picture.


Lunch - This was such a good lunch. Salada sandwich with avocado, tomato, mozzarella, basil and a balsmic/olive oil dressing.


After Yvonne and I cleaned the entire apartment, because if we didn't my Mum would when she got here, I had a mango. Man, this was amazing. I could live off these things.


Snack - These skinny peanut butter brownies were made. It was pretty much like eating fudge. They were fantastic. Why yes, we did finish the tray.


Dinner -I made this random salad consisting of grilled peaches (from a tin), roasted tomatoes, sweet potato chips, spinach, brown rice and salmon. It was fantastic.


Dessert - remains unpictured as it was a mix of yoghurt, brownies, popcorn and fruit - just random bits of whatever I felt like.

And that's all for this week. Have a lovely week guys!

Sunday 23 September 2012

Frozen Yoghurt Bites


I am not a natural runner.

I know a lot of people say this, but I probably the only person who has ever told the truth when saying this. It's kind of a thing in my family - none of us, except my Dad maybe, can really run. I am a short distance sprinter. That's how I roll.

I played tennis and netball for so long I am used to running short distances quickly, using quick bursts of speed to get me from place to place and then getting a quick break every so often. Sure those sports require endurance, and I have endurance, but a different kind of endurance. I cannot continuously run for ages.

So when I go to the gym and run 5km, I run as hard as I can for a few hundred metres, then walk/jog for a few hundred, then run hard again. I cannot jog or run at a moderate speed. It's just not how I do things.

And that is probably why I will never win another running race (my third place in 200m in Year 7 counts as a win, ok), or why, if I enter a marathon, I will come last. I am a tennis player, a sprinter, a skipper, and I'm used to moving my whole body in order to hit a ball.

But even though I'm not a natural runner, I try. I try very hard. I try until my ankles hurt, my shins hurt and for some odd reason, my shoulders (bad posture here). And that's all anyone can ask of me - that I try.


And for today's little inspirational treats, perfect now that the hot weather has well and truly hit us in Queensland, are frozen yoghurt bites. I would kill for one of these babies right now. It is so deliciously hot today (Sunday, for all you Australians who might remember yesterday's heat). These bites are so cold they hurt your teeth, but the sweet biscuit base combines perfectly with the cold, slightly sweet yoghurt to create the perfect snack. You could eat several and not even notice. Out of the bites I made, the strawberry ones were my favourite.


Level of Difficulty: The easiest summer treat ever – and no bake at that, so you don’t need to turn on a hot oven.
Average Cost: $
Main Ingredients: Granitas and Greek Yoghurt
Occasion: Anytime you want.
Menu Options: Use whatever Greek yoghurt you like – plain would work too, but I prefer the flavoured types, especially for something like this.  

Makes 24 mini-muffin-tray sized bites


What you need:
-          100 g granita biscuits / graham crackers / sweet plain biscuits (for Australians any Arnotts biscuits would work)
-          3 tbsp almond butter
-          2 tbsp honey
-          2 tbsp cold water
-          2 170g Chobani Greek yoghurt containers (preferably two different flavours – I used strawberry and mango) or another type of flavoured Greek yoghurt

What to do:

In a food processor, process the biscuits, almond butter and honey. Add the water to make sure a thick dough forms. You want the dough to be rather wet so it stays together well.

Grease a mini muffin tray well. Using a tablespoon, pick up balls of dough and squish into the muffin tray until each muffin round is filled.

Add a tablespoon (probably a little less) of Greek yoghurt into each muffin round until all are filled. You should have exactly half of the tray with one flavour and half with the other flavour.

Freeze bites until set. Eat frozen. 


Thursday 20 September 2012

Goats Cheese and Apple Pie


So this is a throwback recipe.

I made this at the beginning of the year - it is actually one of the first recipes I made which I developed myself. I made it again the other day and took some better pictures and thought I would reshare with you all. This is an absolutely fantastic recipe.

I got the idea from the Hunger Games obviously. This pie, which is more like a crostada, but with a less sweet base, is absolutely fantastic. I like the fact that the base is doughy and not as sweet. I like that the apples are tart and the honey is sweet. This pie does not get old.Enjoy!


Level of Difficulty: Easy
Average Cost: $$
Main Ingredients: goats cheese, apple
Inspired by: Scarletta Bakes and Sugar Laws (I mixed both recipes together to create this one)
Occasion: Breakfast, Snack, Dessert
Menu Options: This is lovely hot, but even better cold. I would serve it hot or cold completely covered with honey (maybe even honey warmed over the stove) and with low fat greek yoghurt. I found I would was eating it cold covered in the sweetest honey I have (tea tree) and dipping it in greek yoghurt (my greek yoghurt is a lot sweeter than most, so maybe a vanilla/honey flavoured yoghurt would be nice too).

What you will need:
For the crust:
3/4 cup self raising/all purpose flour
1/4 tsp salt
Between 1/4-1/2 cup butter, cubed (I would say use a 1/2 cup measuring cup, and fill it three quarters of the way)
3 tbsp white sugar
3 tbsp cold water

Of course, you could use shortcrust or puff pastry if you want, but the dough is absolutely beautiful. It does require refrigeration, and I simply left mine overnight as I ran out of time the day I made the dough. It really made the dough very easy to work with, so I would suggest leaving it overnight.

For the filling:
2 apples – your choice of apple. I used red delicious purely because that was what I had and they are my favourite type, but I think most types would work.
1 tsp cinnamon
3 tsp lemon juice
3 tsp honey
1/3 cup goats cheese – preferably the spreadable type, but if yours is a little chunky like mine was, it doesn’t matter.
3 - 5 tsp honey


What to do:
To make the crust:
In a large bowl combine the flour, salt and white sugar. Stir thoroughly.

Using a mixer (I used a handheld one and found it was easy to make the dough, but I’m sure a stand mixer would be easier) add the butter slowly to the bowl, mixing until the mixture is breadcrumb-like. It should be fine and course. Think thick breadcrumbs.

Add the water and mix further until a dough forms. It will be thick and sticky. Add a little more water if you feel you need to, but not too much.

On a floured surface, knead the dough. You only want to knead until the dough just comes together. Feel free to add flour to your dough to help it do this.

Form the dough into a ball; it should be thick and smooth looking, and not too floury. Wrap the dough in plastic and place in the refrigerator. Like I said, I left my dough overnight, but as long as the dough is properly cold and holds together well – between one and two hours.

When the dough is ready, place it on a sheet of baking paper and roll the dough out until relatively flat. The dough will thicken in the oven, so it can be very thin. As this pie is freeform and messy, make an oval-ish shape with the dough but it does in no way need to be perfect.


Preheat your oven to 230 degrees Celsius and move the parchment paper to a baking tray.

Peel, core and cut the apples. You can cut the apples however you please. As I couldn’t be bothered to make mine look perfect, I simply cut mine into small cubes, which looked and tasted fantastic.

In a bowl, combine lemon juice and cinnamon. As you are cutting the apples put them into the lemon juice to stop them from browning.

Once all of the apples have been cut and coated in the lemon juice mixture, add the honey to the mixture and make sure all apples are coated with the cinnamon, lemon juice and honey.

Spread the goats cheese over the dough. Try to keep the cheese in the fridge immediately prior to doing this. If the cheese is hard, simply crumble it, but try to spread it. My cheese was kind of spreadable, but it did get stuck into the dough and didn’t so much as spread as break the dough. I ended up using my fingers to spread it rather thickly. It doesn’t matter how you do it, just try to not break the dough and if you do, don’t fret, just patch it up – the dough is strong.

Do not spread the cheese all the way to the edge as you have to fold the dough over itself. Therefore, leave a border of about 5 centimetres.

Add the apples to the pie, drizzling any leftover juice over the apples. Also drizzel remaining 3-5 tsp of honey, or more or less, depending on taste, over the top.

Fold the sides of the dough over the fruit filling, and again don’t worry if the dough tears, just patch it up. Once the filling is safely folded inside the dough, bake for 10 – 20 minutes. I say this because it really does depend on how baked you want your fruit to be. I baked mine for approximately 15 minutes, maybe a little less, because my crust was very brown and the apples slightly crispy.

Serve warm or cold.